


Imagine booting up your brand-new custom gaming PC for the first time, the RGB lighting softly glowing, and knowing that every single component was chosen and installed by you. Building your own gaming PC might seem daunting, but as of May 2026, it’s more accessible and rewarding than ever. This complete guide demystifies the process, empowering you to construct a machine tailored precisely to your gaming needs and budget.
Last updated: May 1, 2026
- Select compatible core components: CPU, motherboard, RAM, GPU, storage, and power supply are essential.
- Careful component selection ensures performance and avoids compatibility issues in 2026.
- Assembly requires patience; follow step-by-step instructions to connect everything correctly.
- Testing and troubleshooting are crucial post-build steps to ensure optimal performance and stability.
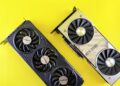
Choosing Your Gaming PC’s Heart and Brain: CPU and Motherboard
Your Central Processing Unit (CPU) and motherboard are the foundational pieces of your gaming PC. The CPU is the computer’s brain, dictating processing power, while the motherboard acts as the central nervous system, connecting all other components. For gaming in 2026, both Intel’s Core i5/i7/i9 series and AMD’s Ry zen 5/7/9 series offer excellent performance tiers.
When selecting a CPU, consider its core count and clock speed – higher is generally better for gaming. However, don’t overlook the motherboard’s socket type; it must match your chosen CPU. For instance, an Intel LGA 1700 socket is required for current-generation Intel CPUs, while AMD uses AM5. Motherboard chipsets also matter, influencing features like overclocking support and the number of M.2 slots for fast storage.
Example: A mid-range build might pair an AMD Ry zen 5 7600X CPU with a B650 chipset motherboard, offering a solid balance of performance and cost. A high-end system could opt for an Intel Core i9-14900K with a Z790 motherboard for maximum gaming power.
Insight: Always check the motherboard’s Qualified Vendor List (QVL) for guaranteed RAM compatibility, especially when aiming for high-speed memory kits. This avoids potential boot issues.
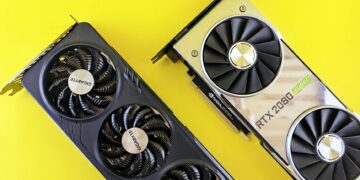
Graphics Powerhouse: Selecting Your Graphics Card (GPU)
The Graphics Processing Unit (GPU) is arguably the most critical component for a gaming PC, directly impacting frame rates and visual fidelity. As of May 2026, NVIDIA’s GeForce RTX 40-series and AMD’s Radeon RX 7000-series are the dominant players, offering impressive performance for modern titles.
When choosing a GPU, consider the resolution and refresh rate of your monitor. A 1440p or 4K monitor will demand a more powerful GPU than a 1080p display. Also, look at the amount of VRAM (Video RAM); 8GB is a good starting point for 1080p, while 12GB or more is recommended for higher resolutions and future-proofing.
Example: For smooth 1440p gaming with high settings, an NVIDIA GeForce RTX 4070 Super or an AMD Radeon RX 7800 XT would be excellent choices. For 4K gaming, consider an RTX 4080 Super or RX 7900 XTX.
Insight: GPU prices can fluctuate significantly. Keep an eye on sales and consider slightly older, but still capable, cards if you’re on a tighter budget. For example, an RTX 4070 can often be found at a better price than a 4070 Super while offering close performance.
Memory and Storage: Speed and Capacity
Random Access Memory (RAM) and storage solutions are vital for smooth multitasking and fast game loading. For gaming PCs in 2026, DDR5 RAM is becoming the standard for new builds, offering higher speeds and efficiency over DDR4. Aim for at least 16GB of RAM for a good gaming experience, with 32GB being ideal for demanding titles and future-proofing.
Storage-wise, Solid State Drives (SSDs) are essential for boot drives and frequently played games due to their significantly faster load times compared to traditional Hard Disk Drives (HDDs). NVMe M.2 SSDs offer the best performance, connecting directly to the motherboard for maximum bandwidth. You might pair a fast 1TB NVMe SSD with a larger, more affordable HDD for storing your game library.
Example: A common setup is a 1TB NVMe SSD for the operating system and primary games, supplemented by a 2TB HDD for additional game storage and media files.
Insight: While HDDs are cheaper per gigabyte, the performance gain from an SSD, especially for game loading screens, is immense. The difference can be the difference between waiting minutes or seconds to jump into the action.
Powering Your Build: The Power Supply Unit (PSU)
The Power Supply Unit (PSU) provides electricity to all your PC components. Choosing an adequate PSU is crucial for system stability and longevity. Insufficient power can lead to performance throttling, crashes, or even component damage.
PSU wattage should be calculated based on the combined power draw of your CPU and GPU, with some headroom. Online PSU calculators are useful tools for estimating your needs. Furthermore, consider the PSU’s efficiency rating (e.g., 80 Plus Bronze, Gold, Platinum); higher ratings mean less wasted energy and heat. Modularity (fully, semi, or non-modular) affects cable management ease.
Example: For a build with a Ryzen 7 7700X and an RTX 4070, a 750W 80 Plus Gold modular PSU would provide ample power and efficiency, with room for potential upgrades.
Insight: Never skimp on the PSU. A cheap, low-quality unit can be the single point of failure for your entire system. Investing in a reputable brand with a good efficiency rating is always wise.
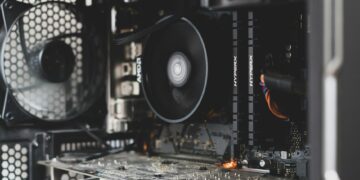
The Case: Housing Your Components
The PC case is more than just an enclosure; it affects airflow, component fit, and aesthetics. Cases come in various sizes (form factors) such as ATX, Micro-ATX, and Mini-ITX, which must be compatible with your motherboard.
When selecting a case, consider its cooling potential – look for good fan mounts and mesh front panels for optimal airflow. Cable management features, such as routing cutouts and tie-down points, make building easier and improve internal aesthetics. Ensure the case has enough clearance for your GPU and CPU cooler height.
Example: A mid-tower ATX case like the Fractal Design Meshify 2 Compact offers excellent airflow, ample space for components, and user-friendly cable management features, making it a popular choice for many builds.
Insight: Aesthetics are subjective, but functionality is key. Prioritize a case with good airflow and ease of building over a flashy design that might compromise cooling performance.
The Assembly Process: Putting It All Together
With all your components ready, it’s time for assembly. This is where patience and careful execution are paramount. Begin by preparing your motherboard outside the case on its anti-static bag or box.
- Install the CPU: Carefully align the CPU with the socket on the motherboard, noting the triangle markers, and gently lower it into place. Secure the retention arm.
- Install the CPU Cooler: Apply thermal paste if not pre-applied, then mount the CPU cooler according to its instructions. For larger coolers, this might be easier before installing the motherboard into the case.
- Install RAM: Open the clips on the RAM slots and insert the memory modules, ensuring they click into place. Consult your motherboard manual for the correct slots for dual-channel configuration.
- Mount the Motherboard: Install the motherboard’s I/O shield into the case first, then carefully align the motherboard with the standoffs in the case and screw it in place.
- Install Storage Drives: Mount your SSDs and HDDs into the designated bays or M.2 slots.
- Install the GPU: Open the rear expansion slot covers on the case, align the GPU with the primary PCIe slot on the motherboard, and push it firmly until it clicks. Secure it with screws.
- Install the PSU: Mount the power supply unit in its designated location within the case, typically at the bottom or top rear.
- Connect Cables: This is the most intricate step. Connect the main 24-pin ATX power cable and the 8-pin CPU power cable to the motherboard. Connect power cables to the GPU and storage drives. Finally, connect the front panel connectors (power button, USB ports, audio) to the motherboard headers – refer to your motherboard manual meticulously for pin layouts.
Practical Tip: Before closing the case, connect a monitor, keyboard, and mouse, and power on the system briefly to ensure it POSTs (Power-On Self-Test) and you can access the BIOS/UEFI. This saves you from disassembling if there’s an issue.
Post-Build: OS Installation and Driver Updates
Once your PC boots into the BIOS/UEFI, you’re ready to install your operating system. You’ll need a USB drive with a Windows or Linux installer. Boot from the USB drive and follow the on-screen prompts.
After the OS is installed, the next crucial step is installing all necessary drivers. This includes motherboard chipset drivers, network drivers, audio drivers, and most importantly, the latest GPU drivers from NVIDIA or AMD. Outdated drivers can severely impact performance and stability.
Example: After installing Windows 11, visit the motherboard manufacturer’s website (e.g., ASUS, MSI, Gigabyte) for the latest drivers. Then, go directly to NVIDIA’s or AMD’s website to download the newest driver package for your specific graphics card model.
Insight: For optimal gaming performance, ensure that Windows is set to its High Performance power plan and that any game-specific optimizations within your GPU control panel are enabled.
Common Pitfalls and How to Avoid Them
Building a PC can introduce opportunities for error. Understanding common mistakes helps prevent them.
Forgetting the I/O Shield: This small metal plate that covers the motherboard’s ports on the back of the case is often forgotten. Install it before mounting the motherboard.
Incorrect RAM Installation: RAM sticks can be installed backward or not fully seated, preventing the PC from booting. Ensure clips engage on both sides and the notch aligns.
Static Discharge: Touching components without grounding yourself can damage them. Use an anti-static wrist strap or touch a grounded metal object (like the PC case) frequently.
Over-tightening Screws: Applying too much force when screwing in components, especially the motherboard or cooler, can strip threads or crack the PCB.
Ignoring Manuals: Motherboard and component manuals are invaluable. They detail specific installation steps, pin layouts, and troubleshooting tips. Always consult them.
Insight: When troubleshooting boot issues, try booting with minimal components: CPU, one RAM stick, and GPU. If it POSTs, gradually add components back until the issue reappears to isolate the faulty part.
Expert Tips for a Superior Gaming PC Build
Beyond the basic steps, several advanced tips can elevate your build.
Component Compatibility Check: Use online tools like PCPartPicker.com before purchasing components. It automatically checks for most compatibility issues between parts and estimates wattage needs. According to PCPartPicker’s data, as of May 2026, thousands of users rely on it daily for build planning.
Cable Management: Invest time in clean cable management. Route cables behind the motherboard tray and use zip ties or Velcro straps. This improves airflow and makes future upgrades much easier.
BIOS/UEFI Updates: After the initial setup, check for motherboard BIOS/UEFI updates. These can improve stability, add support for new CPUs, and enhance performance. According to Gigabyte’s support pages, BIOS updates often include crucial stability enhancements for new hardware releases.
Cooling Solutions: For high-performance CPUs or GPUs, consider after market CPU coolers (air or liquid AIO) and additional case fans for optimal thermal performance. Proper cooling prevents thermal throttling, ensuring your components run at their peak speeds.
Unique Insight: Consider building a ‘silent PC’ by selecting components known for low noise emissions, using sound-dampening case materials, and employing PWM fans that adjust speed based on temperature. This provides an immersive gaming experience without distracting fan noise.
Frequently Asked Questions
Do I need to be an expert to build a gaming PC?
No, you don’t need to be an expert. With detailed guides like this one and online resources, anyone can learn how to build a gaming PC. Patience and careful attention to component compatibility and assembly steps are key.
How long does it take to build a gaming PC?
For a first-time builder, the process can take anywhere from 3 to 8 hours. Experienced builders can often complete a build in 1 to 2 hours. This time includes component installation, cable management, OS installation, and driver setup.
How much does it cost to build a gaming PC in 2026?
As of May 2026, entry-level gaming PCs can be built for around $700-$1000, mid-range for $1000-$1500, and high-end systems can cost $2000 or more. Prices depend heavily on component choices and current market conditions.
Can I upgrade my gaming PC later?
Yes, one of the biggest advantages of building your own gaming PC is degradability. You can swap out the GPU, add more RAM, or upgrade storage as new technology emerges or your needs change.
What are the most common mistakes when building a PC?
Common errors include forgetting the I/O shield, not seating RAM properly, static discharge damaging components, over-tightening screws, and failing to consult component manuals for critical information.
Is it cheaper to build a gaming PC or buy a pre-built one?
Generally, building your own PC is slightly cheaper and offers better value, as you avoid the manufacturer’s markup on labor and choose exactly what you want. Pre-built PCs offer convenience but often come at a premium price.
Conclusion
Building a gaming PC in 2026 is a fulfilling project that results in a powerful, personalized gaming experience. By carefully selecting compatible components, following assembly instructions diligently, and performing thorough post-build checks, you can create a machine that meets your exact gaming needs.
Actionable Takeaway: Start planning your build today by using a tool like PCPartPicker.com to select your components and verify compatibility – this is the single most important first step to ensure a smooth building process.


