Integration Guide
Connecting with Zapier gives you access to all kinds of cool automation for your Leads. In this example we will explain how to send an email each time a new Lead is generated. To accomplish this we will be using the Zapier Webhooks feature. Follow these steps:
Difficulty: MediumStep 1
Go to: https://zapier.com/app/min/62/start
Step 2
Click "Make this Zap!"
Step 3
Click "Gimme my URL!"
Step 4
Copy the generated "Webhook URL" to your clipboard, then click the "Ok, continue" button
Step 5
Paste the copied URL in a text editor, and add the following string to the end of it:
?Email=bobsmith@gmails.com&FirstName=Bob&LastName=Smith&HomePhone=555-555-1111&MobilePhone=555-555-2222&BusinessPhone=555-555-3333&PostalCode=14216&StreetAddress=4006+Rugby+Road&City=Buffalo&State=NY&Time=01-01-2000:2159&OfferName=Test+Offer+Name
The full thing should look like this (be sure to use your own version of the URL you copied earlier):
https://hooks.zapier.com/hooks/catch/1111111/1aa1aa/?Email=bobsmith@gmails.com&FirstName=Bob&LastName=Smith&HomePhone=555-555-1111&MobilePhone=555-555-2222&BusinessPhone=555-555-3333&PostalCode=14216&StreetAddress=4006+Rugby+Road&City=Buffalo&State=NY&Time=01-01-2000:2159&OfferName=Test+Offer+Name
Step 6
Copy the full URL that was created in Step 5 and load it in a seperate tab on your browser. You will then see a success message that looks like this:
{"status": "success", "attempt": "57d83e52-7757-4c7f-9064-c667d98b9510", "id": "167e9c40-6c43-4241-a4cc-4e273c99eec4", "request_id": "GmlHfEwFe90yk7OE"}
Step 7
Back in the Zapier setup wizard, on the page titled "Trigger Test", click the button "Continue + fetch the Hook"
Step 8
Cool! Now configure the email to be sent when a new Lead is generated. You can send an email to yourself with all the Lead data in real-time (see Example 1). Or, you can send an email to the actual Lead contact (see Example 2). Keep in mind, that Lead data (like Email Address, First Name, Phone Number) is referred to as "Querystring" in the Zapier system. Simply use the "Insert fields" button to add your Lead data where appropriate.
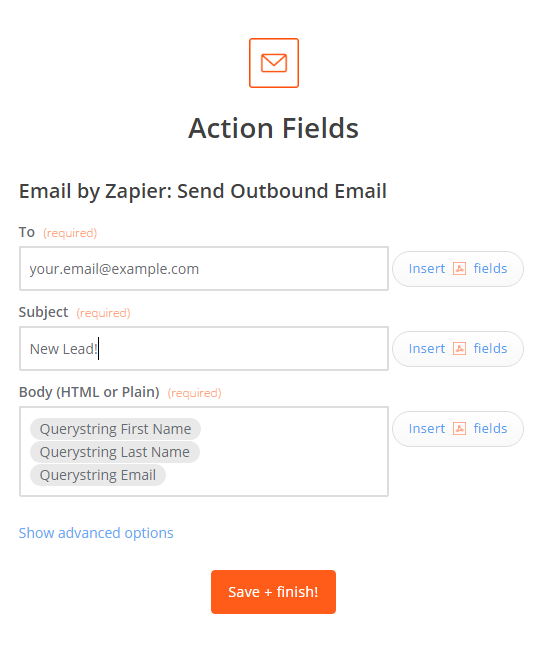 Example 1 Receive your Lead data in real-time by adding your email address to the "To" field and including your Lead data (referred to as a Querystring in Zapier) in the email "Body" field.
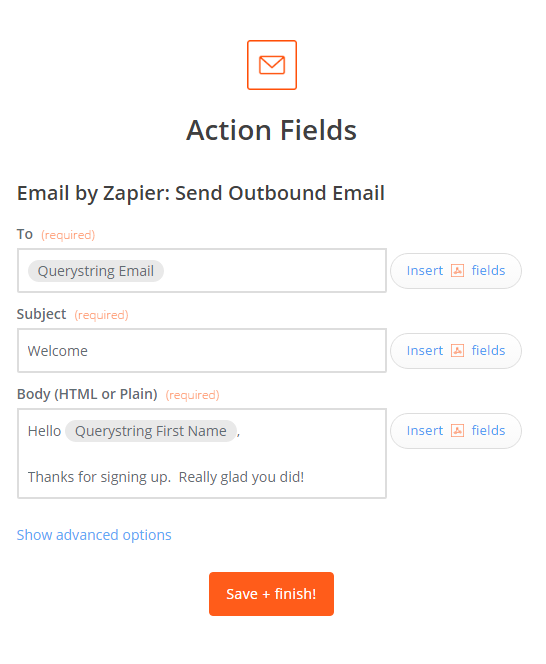 Example 2 Send an email to new leads, by adding "Querystring Email" in the "To" field and then craft your message.
Step 9
Click "Save + finish!" and you're done with the Zapier side of the integration.
Step 10
In your Leadserve account, create a new Offer. On the final step of the wizard (Lead Transfer) select "Send my Leads in real-time, as soon as they are generated", then select "Deliver my Leads into my email marketing platform", then select Zapier from the list below.
Step 11
Paste your Zapier Account ID, and Zapier Zap ID in their respective fields. These IDs are found in the URL you copied and saved from Step 4.
https://hooks.zapier.com/hooks/catch/[YOUR ACCOUNT ID]/[YOUR ZAP ID]/
Step 12
Click "Next" and you're done!
Advanced
Once you have Leadserve sending data to Zapier through webhooks, you can do all kinds of cool stuff, including sending Leads to a Google Spreadsheet or to an email marketing platform. To connect Leads with additional services check out our Advanced Zapier Integration.