


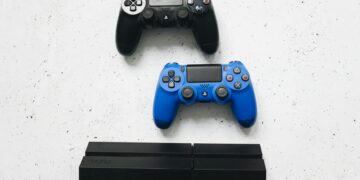


The Essential 2026 Guide to Cleaning Your PlayStation 4 Pro
Your PlayStation 4 Pro, a powerhouse for 4K gaming, requires diligent maintenance to continue delivering peak performance. As of April 2026, the console’s advanced components, especially its powerful GPU, and 4K capabilities, generate significant heat. Accumulations of dust and debris inside the console can impede airflow, leading to overheating, performance throttling, and even long-term damage. This complete guide will walk you through the process of how to clean your PlayStation 4 Pro, ensuring its longevity and optimal operation for years to come.
Last updated: April 27, 2026
- Regular external dusting with a microfiber cloth prevents initial dust buildup.
- Compressed air is essential for clearing dust from vents and ports without disassembly.
- For deep cleaning, disassembling the PS4 Pro requires specific tools like Torx security screwdrivers and static wrist straps.
- Replacing thermal paste can improve heat dissipation for older consoles.
- Proper cable management aids airflow and reduces dust attraction.
The most effective way to clean your PlayStation 4 Pro involves a multi-step approach, addressing both external and internal components. Neglecting this can lead to audible fan noise, game stuttering, and eventual system shutdowns. This guide focuses on practical, actionable steps suitable for experienced users looking to maintain their high-performance gaming console.
Why Cleaning Your PS4 Pro Matters in 2026
Modern gaming consoles like the PS4 Pro are sophisticated pieces of technology packed into compact chassis. According to Tech Radar (2023), the PS4 Pro’s design prioritizes performance — which means more heat generated. Dust acts as an insulator, trapping heat and forcing the console’s fans to work harder and longer. This increased strain can shorten the lifespan of the fan motor and other sensitive electronic components. Also, excessive dust buildup can obstruct the intake and exhaust vents, critically hindering the console’s ability to cool itself, a problem that becomes more pronounced as components age and their thermal efficiency decreases.
Beyond thermal issues, dust can also interfere with physical connections. Dust particles can accumulate in USB ports, HDMI ports, and even the Blu-ray drive’s optical sensor, potentially causing connection errors or read failures. A clean console operates more quietly, performs more consistently, and In the end, lasts longer. Here’s especially relevant in 2026, as many PS4 Pro units are now several years old and may be experiencing the cumulative effects of dust accumulation.
Gathering Your PS4 Pro Cleaning Supplies
Before you begin, ensure you have the right tools. Using improper items can cause damage. For a basic external clean, you’ll need:
- Microfiber cloths (at least two: one for cleaning, one for drying)
- A soft-bristled brush (like a clean paintbrush or a dedicated electronics cleaning brush)
- A can of compressed air
- Isopropyl alcohol (90% or higher concentration)
- Cotton swabs (Q-tips)
For a more thorough internal cleaning, you will need to disassemble the console. This requires:
- A set of Torx security screwdrivers (In particular T8 and T9 sizes, often found in electronics repair kits)
- A plastic spudger or opening tool to gently pry open the casing
- A static wrist strap to prevent electrostatic discharge (ESD) damage
- Small containers to organize screws
When using compressed air, always hold the can upright and use short bursts. don’t spray directly onto sensitive components for extended periods, as the propellant can cause extreme cold and condensation. Sony PlayStation Support offers general guidance on console care, though specific disassembly instructions aren’t officially provided due to warranty implications.
Step-by-Step External Cleaning
Start with the exterior. Here’s the least invasive method and should be performed regularly, perhaps every 1–2 months, depending on your environment.
- Power Down and Unplug: Ensure the console is completely powered off, not in rest mode. Disconnect the power cable and all other connected cables (HDMI, USB, Ethernet).
- Dust the Casing: Use a dry microfiber cloth to gently wipe down the entire exterior surface of the PS4 Pro. Pay attention to the vents and seams where dust tends to collect.
- Clean Vents: Use the compressed air can to blow dust out of the console’s vents. Hold the can upright and use short, controlled bursts. Aim the nozzle at an angle to dislodge dust, not force it deeper into the console. You can also use a soft brush to loosen stubborn dust before using compressed air.
- Wipe Down Ports: Gently use compressed air to clear any dust from the USB ports, HDMI port, and the optical drive slot. Avoid inserting anything into the ports.
- Clean the Surface: For any smudges or grime, lightly dampen a microfiber cloth with water or a very small amount of isopropyl alcohol (ensure it’s fully evaporated before plugging the console back in). Never spray liquid directly onto the console.
- Dry Thoroughly: Use a dry microfiber cloth to ensure all surfaces are completely dry.
This external cleaning routine helps maintain a baseline level of cleanliness and prevents the more significant internal buildup that necessitates disassembly.
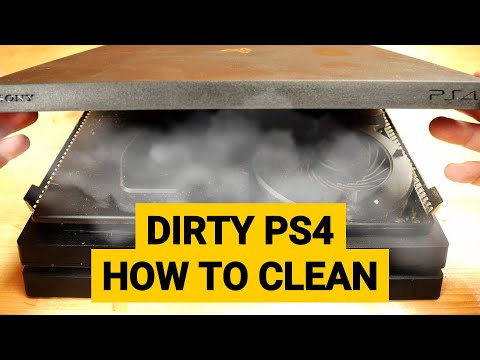
Internal Cleaning: A Deeper Dive (Use Caution)
For a truly thorough cleaning, you’ll need to open up the PS4 Pro. This process carries some risk and may void your warranty if not performed correctly or if damage occurs. Proceed only if you’re comfortable with electronics and have the necessary tools. According to iFixit, a reputable source for device repair guides, disassembling a PlayStation console requires patience and attention to detail (iFixit PS4 Pro Teardown). As of April 2026, Sony doesn’t officially endorse user disassembly, so proceed at your own risk.
Opening the PS4 Pro
- Prepare Your Workspace: Work on a clean, well-lit, and static-free surface. Wear your anti-static wrist strap, connecting it to a grounded metal object.
- Remove the Rear Cover: The PS4 Pro has a plastic cover on the rear side. Unscrew the two Torx security screws holding it in place. These screws might be slightly different sizes, so keep track. Gently slide the cover off.
- Remove the Top Cover: The main top casing is held by several screws. You’ll typically find them around the perimeter and potentially under rubber feet. Once screws are removed, the top cover can be carefully lifted or slid off.
- Access the Fan and Heatsink: With the casing open, you’ll see the large metal heatsink and the cooling fan. This is where most dust accumulates.
Cleaning the Fan and Heatsink
- Fan Cleaning: Use compressed air to blow dust from the fan blades and motor. You may need to gently hold the fan blades with a finger or tool to prevent them from over-spinning. Use a soft brush to dislodge stubborn dust.
- Heatsink Cleaning: This is critical. The heatsink fins are designed to dissipate heat efficiently. Dust buildup here’s detrimental. Use compressed air to blow dust out from between the fins. Blow air from one side and try to catch the dust with a vacuum cleaner (held at a safe distance) or another cloth to prevent it from settling elsewhere.
- Motherboard and Other Components: While the console is open, use compressed air to gently blow dust from the motherboard, power supply unit, and other accessible components. Be very careful not to dislodge any wires or components.
Reassembly
Reassembly is the reverse of disassembly. Ensure all screws are returned to their original locations and that all cables are reconnected properly. Double-check that no tools or debris are left inside the console before closing it up.
Advanced Maintenance: Thermal Paste Replacement
For PS4 Pro consoles that are several years old (and most units as of 2026 are), the original thermal paste between the CPU/GPU and the heatsink may have dried out and become less effective. Replacing this paste can improve thermal transfer and reduce operating temperatures. This is a delicate procedure:
- Remove the Heatsink Assembly: After opening the console, you’ll need to carefully detach the heatsink assembly. This typically involves unscrewing it from the motherboard.
- Clean Off Old Paste: Use isopropyl alcohol and a lint-free cloth or cotton swabs to thoroughly clean the old thermal paste from both the processor dies (CPU and GPU) and the base of the heatsink.
- Apply New Thermal Paste: Apply a small, pea-sized amount of high-quality thermal paste (e.g., Arctic MX-4, Noctua NT-H1) to the center of the CPU and GPU dies. don’t over-apply.
- Reattach Heatsink: Carefully place the heatsink assembly back onto the motherboard, ensuring it aligns correctly. Secure it with its screws, tightening them gradually in a cross pattern to ensure even pressure.
This process requires precision. If you’re not confident, it’s best to seek professional help. Reputable repair shops often offer this service for a reasonable fee.
Troubleshooting Common PS4 Pro Overheating Issues
If your PS4 Pro is overheating despite cleaning, consider these factors:
- Fan Malfunction: The fan might be failing or clogged internally beyond what compressed air can reach.
- Blocked Airflow: Ensure the console has ample space around it. The PS4 Pro requires significant ventilation. Avoid placing it in enclosed cabinets or stacking other items on top. According to Digital Trends, proper ventilation is key to sustained performance.
- Dried Thermal Paste: As mentioned, this is a common culprit for older consoles.
- Environmental Factors: Playing in a hot room can exacerbate heat issues.
FAQ: Frequently Asked Questions
Can I use a vacuum cleaner to clean my PS4 Pro?
It’s generally not recommended to use a standard household vacuum cleaner directly on internal components. The strong suction can create static electricity, potentially damaging sensitive electronics, or even dislodge small parts. A compressed air can is a safer alternative for blowing dust out.
How often should I clean my PS4 Pro?
Perform a light external cleaning every 1–2 months. A more thorough internal cleaning, including dust removal from vents and fans, is recommended every 6–12 months, depending on your environment and usage. If you notice increased fan noise or heat, clean it sooner.
Will cleaning my PS4 Pro void the warranty?
If your PS4 Pro is still under warranty, opening the console yourself for internal cleaning could void it. Check Sony’s current warranty terms. However, external cleaning should never void a warranty. For internal cleaning, consider professional services if warranty coverage is a concern.
What are the risks of disassembling my PS4 Pro?
The primary risks include damaging delicate internal components with static discharge, breaking plastic clips or connectors, losing screws, or improperly reassembling the console, leading to further malfunction. Always use proper tools and take precautions against static electricity.
Is it worth replacing the thermal paste on my PS4 Pro?
Yes, especially if your console is several years old and you’ve noticed increased temperatures or fan noise. Replacing dried-out thermal paste can improve cooling efficiency and restore performance, extending the console’s usable life — which is a valuable consideration in 2026.
Conclusion: Maintain Your Machine for Peak Performance
Keeping your PlayStation 4 Pro clean isn’t just about aesthetics. It’s a critical aspect of maintaining its performance, reliability, and lifespan. By following these steps for external and internal cleaning, and considering advanced maintenance like thermal paste replacement, you can ensure your console continues to provide exceptional gaming experiences well into the future. Regular maintenance is a small investment of time that pays significant dividends in console longevity and gameplay quality. Don’t let dust be the reason your gaming sessions are cut short.


